Dynamic authorization with user attributes in SAP CAP and AMS
This blog was first published in the SAP Community: https://community.sap.com/t5/technology-blog-posts-by-sap/dynamic-authorisation-with-user-attributes-in-sap-cap-and-ams/ba-p/14388853
Written with AI and reviewed by me.
Introduction: The Business Challenge
Your company just acquired a new business unit. Overnight, 500 users need access to sales data, but only for their division. Traditional role-based access control means creating roles like Sales_Manager_EMEA, Sales_Manager_APAC, Sales_Manager_LATAM, and countless variations. As dimensions multiply (division, region, department, cost center), you face role explosion—hundreds or thousands of roles that don’t scale.
There’s a better way. With Authorization Management Service (AMS) and Cloud Identity Services, you define a single policy with a restriction:
Give READ access where division = $user.division
The $user.division pulls from the authenticated user’s profile. Authorization administrators manage policies through the Cloud Identity Services console—no code changes, no deployments. When a sales manager transfers from EMEA to APAC, HR updates the division attribute in the corporate identity system, and access automatically adjusts across all applications. No role re-assignment required.
Understanding the Technical Foundation
Building on recent SAP Community blogs on AMS (here and here), let’s focus on attribute-based authorization.
The stack:
- Cloud Identity Services authenticates users and stores attributes (division, cost center, region)
- AMS manages and evaluates authorization policies at runtime
- CAP applications enforce authorization using user attributes for dynamic filtering
Traditional RBAC vs. attribute-based:
- Traditional:
Sales_Manager_EMEA,Sales_Manager_APAC,Sales_Manager_LATAM→ doesn’t scale - Attribute-based:
where division = $user.division→ dynamic, adapts automatically
The runtime flow:
- User logs in through corporate IdP (e.g., Microsoft Entra ID)
- IAS returns JWT with custom attributes (
division,warehouse, etc.) - CAP extracts attributes and makes them available to AMS
- Database queries are automatically filtered based on user attributes
- User sees only data they’re authorized to access
This approach delivers measurable business benefits: significant reduction in “access change” requests to IT teams, and a single source of truth in IAS for access decisions with complete audit trail for compliance.
Implementation Walkthrough: The Complete Picture
Let’s walk through the actual implementation:
- IAS Configuration: Configure custom attributes in Cloud Identity Services
- AMS Schema: Declare available user attributes in the schema
- CAP Server Integration: Extract attributes from JWT and map to CAP & AMS user object
- Authorization Policies: Create policies in Cloud Identity Services with attribute-based restrictions
Step 1: Configure Custom Attributes in Cloud Identity Services
Business context: Your organization structures access by division and warehouse. Users should only access data related to their assigned division and warehouse location.
Configuration steps:
- Navigate to IAS Admin Console → Applications → Your Application
- Under the Trust → Attributes tab, add new attributes:
- Name:
division - Source: Cloud Identity Services or the corporate identity provider
- Name:
Do the same for the warehouse attribute.
Example user attributes:
- [email protected] → division: “LOG”, warehouse: “MAD”
- [email protected] → division: “RET”, warehouse: “BCN”
Verify the attribute in JWT:
After authentication, decode the JWT token (e.g., at jwt.io) and you will find:
{
	"sub": "[email protected]",
	"division": "LOG",
	"warehouse": "MAD"
}
This confirms the custom attribute is flowing from IAS into your application’s authentication token.
Step 2: Define User Attributes in AMS Schema
Before using $user.division or $user.warehouse in policies, you must declare it in the AMS schema. This tells the AMS runtime what attributes are available for policy evaluation.
Edit ams/dcl/schema.dcl:
SCHEMA {
	"$user": {
		groups: String,
		division: String,
		warehouse: String
	}
}
What this does:
- Declares the structure of user attributes available in policy expressions
divisionandwarehouseare now recognized by the DCL compiler- Enables autocomplete and validation in policy files
Step 3: Map JWT Token Attributes to AMS Input
The critical piece: AMS needs to extract custom attributes from the JWT token and make them available to policy evaluation. This is where you connect the IAS attributes to the CAP/AMS authorization context.
Create a custom auth provider in srv/server.js:
const cds = require('@sap/cds');
const { amsCapPluginRuntime, IdentityServiceAuthProvider } = require("@sap/ams");

class CustomAuthProvider extends IdentityServiceAuthProvider {
/**
* @param {import("@sap/xssec").IdentityServiceSecurityContext} securityContext
*/
	getInput(securityContext) {
		const defaultInput = super.getInput(securityContext);
		// Extract custom attribute from JWT token payload
		const division = securityContext.token.payload.division;
		if (division) {
			defaultInput["$user.division"] = division;
		}
		// You can add more attributes here
		const warehouse = securityContext.token.payload.warehouse;
		if (warehouse) {
			defaultInput["$user.warehouse"] = warehouse;
		}
		return defaultInput;
	}
}

// Register the custom auth provider
amsCapPluginRuntime.authProvider.xssecAuthProvider = new CustomAuthProvider(amsCapPluginRuntime.ams);
What this does:
- Extends AMS’s
IdentityServiceAuthProviderto intercept token processing - Extracts
divisionandwarehousefrom the JWT payload (e.g.:securityContext.token.payload.division) - Maps it to
$user.divisionfor use in DCL policies and CAP restrictions - Attributes are now available throughout your authorization logic
Verification: You can log the attribute to confirm it’s accessible:
// In srv/service.js
this.before('READ', 'Orders', async (req) => {
	console.log('User division:', req.user.attr.division || 'not set');
	console.log('User warehouse:', req.user.attr.warehouse || 'not set');
});
Step 4: Create Authorization Policies with User Attribute Restrictions
Now that attributes are flowing from IAS → JWT → CAP/AMS context, you can create authorization policies that reference them.
Cloud Identity Services Authorization Policies Approach
Navigate to Cloud Identity Services → Applications → Your Application → Authorization Policies to create policies with attribute-based restrictions.
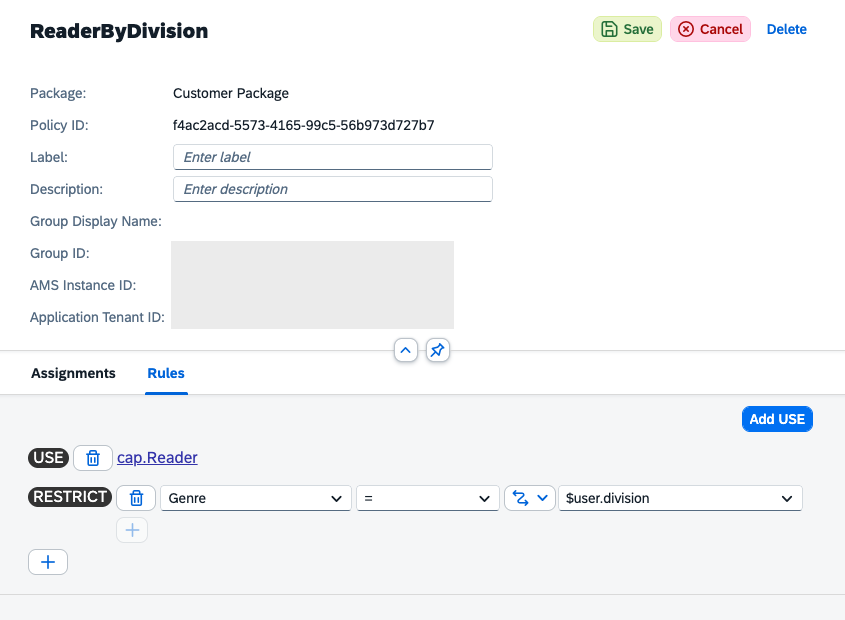
Creating a DivisionReader policy:
- In the Cloud Identity Services admin console, open your application
- Navigate to the Authorization Policies tab
- Create a new restriction (e.g.,
ReaderByDivision) based on an existing restriction (Readerin the example below) - Add a Restriction:
division = $user.division - Assign users or groups to this policy
What happens at runtime:
- User with
division: "LOG"requestsGET /orders - AMS evaluates the
DivisionReaderpolicy with$user.division = "LOG" - The restriction
division = $user.divisionbecomesdivision = "LOG" - CAP injects
WHERE division = 'LOG'into the SQL query - User only sees orders for the Logistics & Distribution division
- The same query executed by a user with
division: "RET"automatically returns only Retail Operations orders
CAP Service restriction annotations approach
For developers who prefer to define authorization rules in code (especially during development), you can also reference $user.division directly in CAP service definitions:
service OrderService {
	@restrict: [{
		grant: ['READ'],
		to: ['ReadOrders'],
		where: 'division = $user.division'
	}]
	entity Orders as projection on data.Orders;
	@restrict: [{
		grant: ['READ'],
		to: ['ReadInventory'],
		where: 'warehouse = $user.warehouse'
	}]
	entity Inventory as projection on data.Inventory;
}
Benefits and Separation of Concerns
This attribute-based authorization approach delivers concrete advantages through clear separation of responsibilities:
For Developers: Build the technical foundation once
- Configure attribute extraction from JWT tokens
- Declare available attributes in the AMS schema
- Deploy the application
For Authorization Administrators: Manage access through the UI
- Create policies in Cloud Identity Services
- Define attribute-based restrictions without coding
- Modify policies as organizational needs change—no deployments required
For HR/Identity Teams: Maintain user attributes as single source of truth
- Update user profiles when employees change roles or divisions
- Attributes automatically sync to Cloud Identity Services with Identity Provisioning
- Access adjusts across all integrated applications
References
Check out the ams-samples-node repository. CAP Developer Guide: Role Assignment with AMS AMS documentation